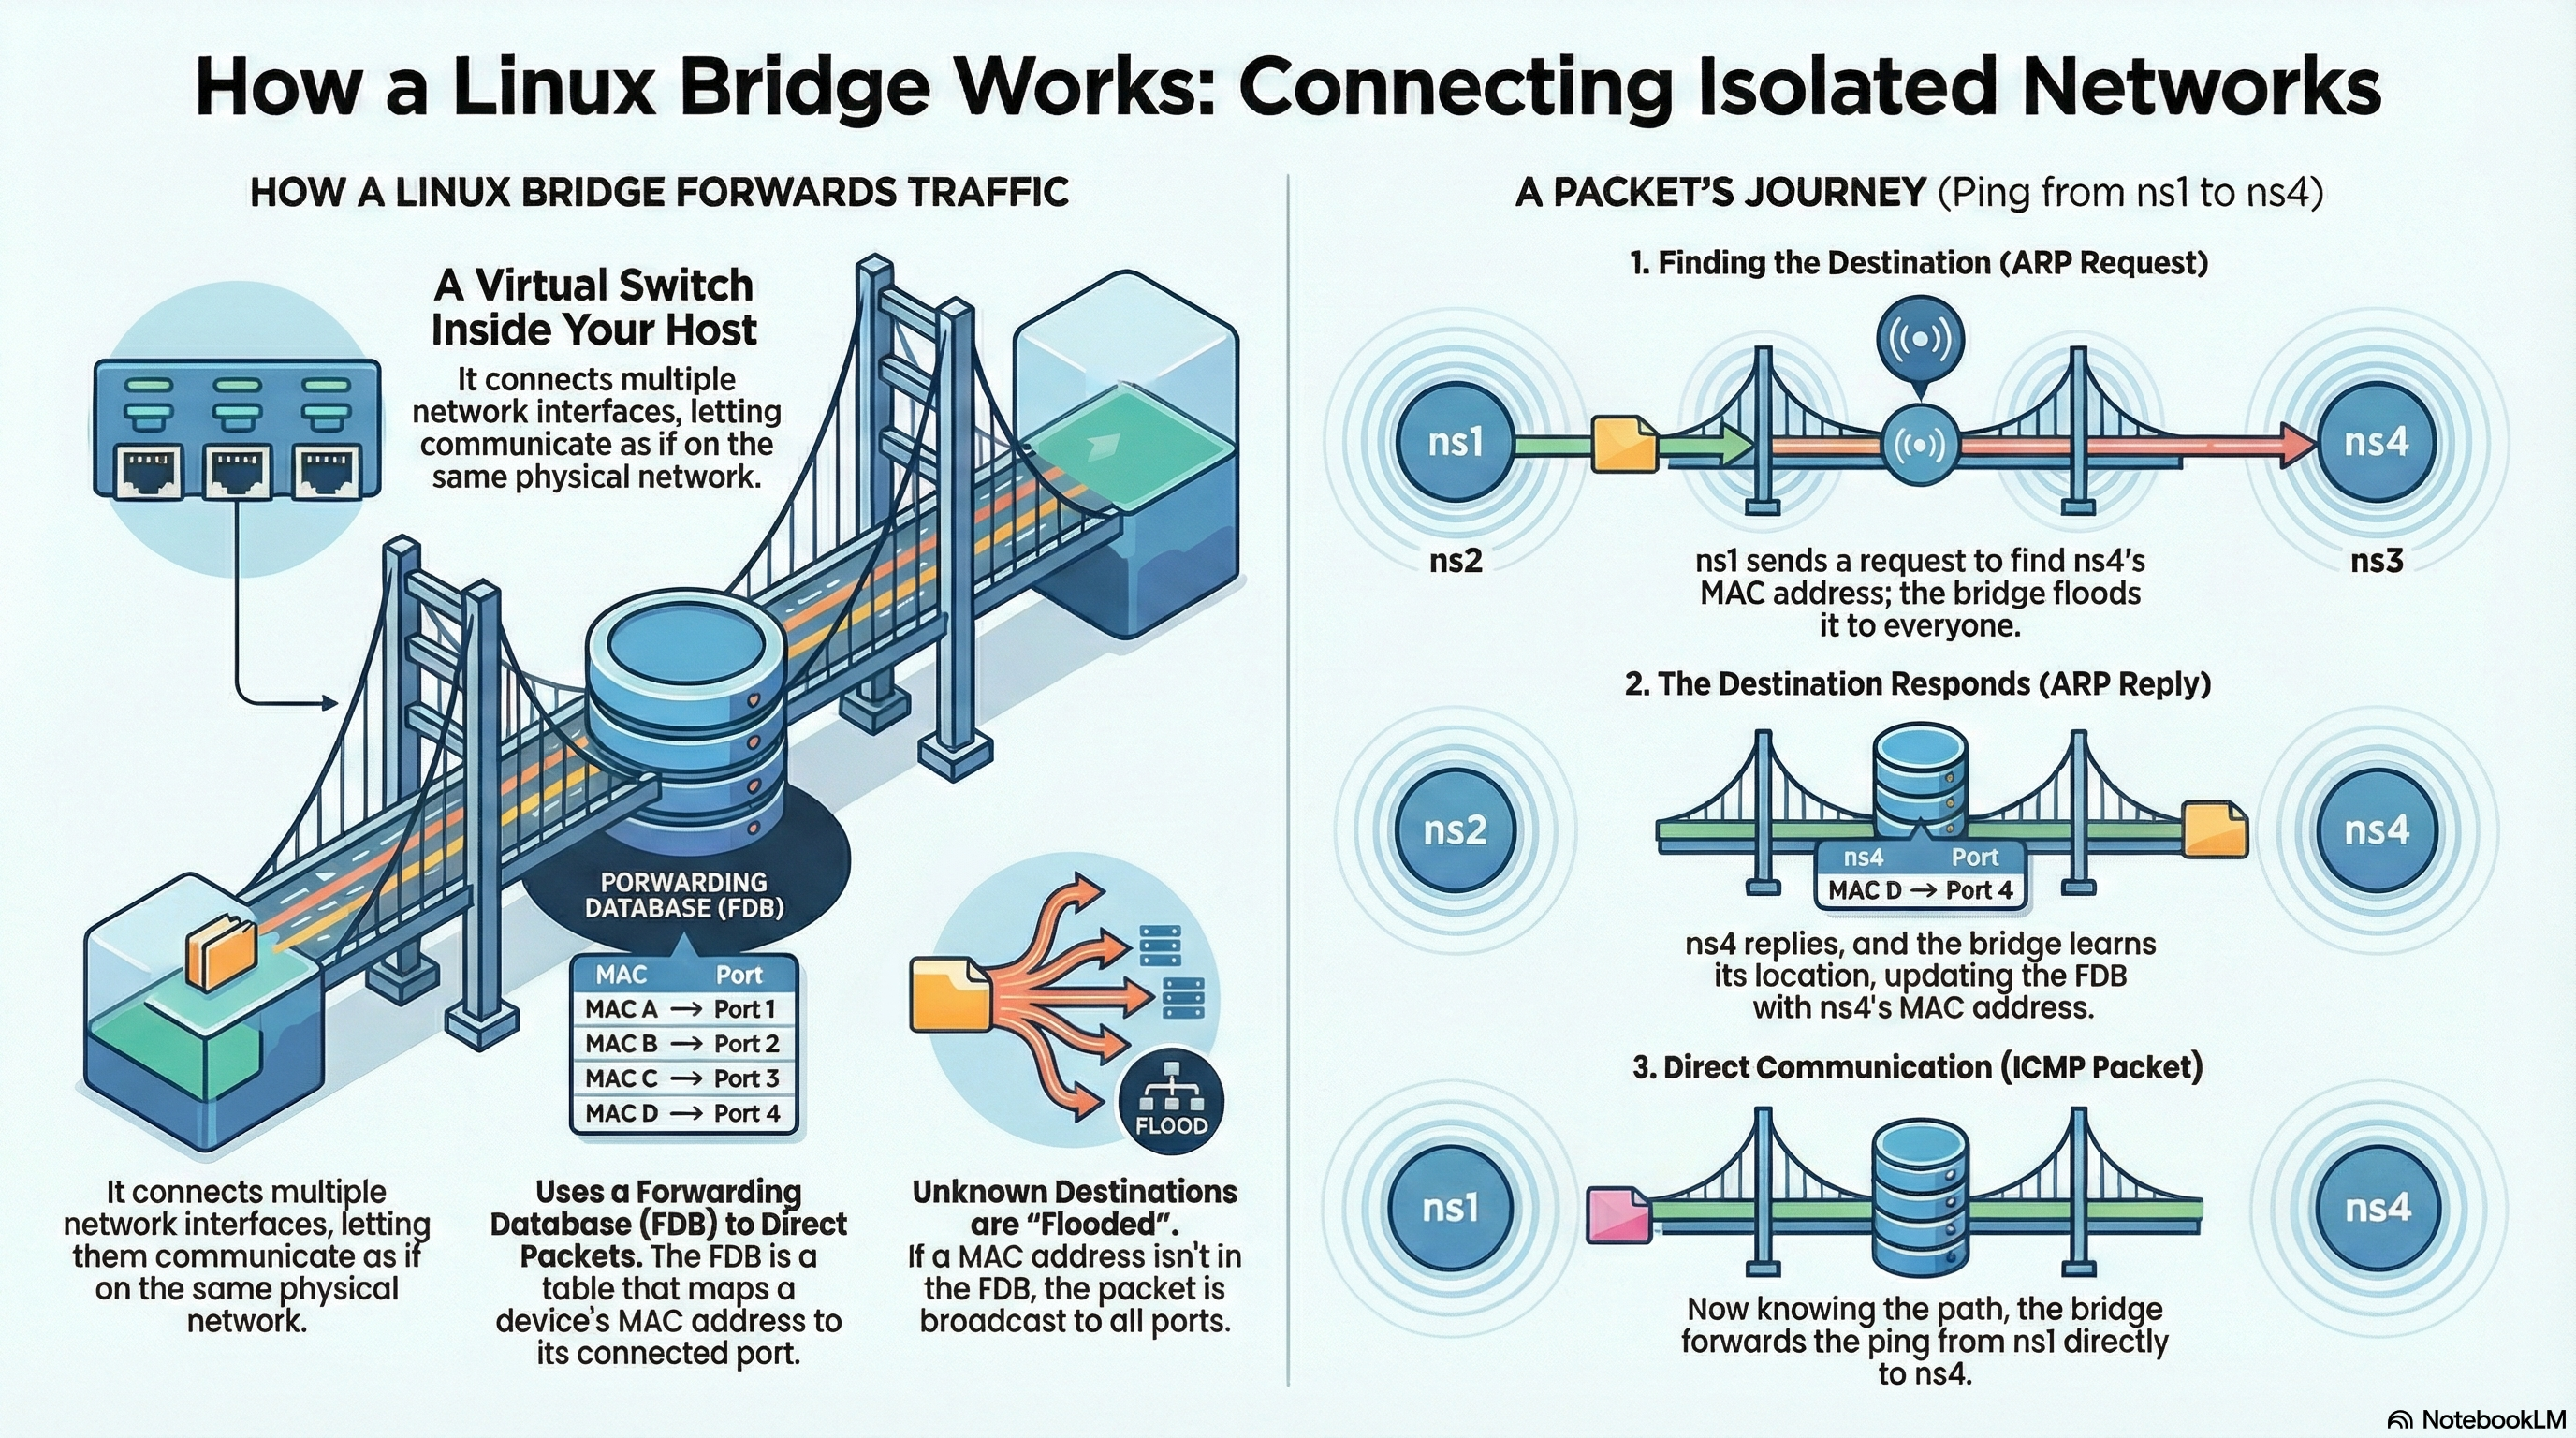
Linux Bridge & Forwarding Database: The Invisible Switch in Your Kernel
This post is part of the Container Networking From Scratch series — follow a packet’s path through the Linux kernel, from namespaces to NAT.
If you don’t understand how the Linux bridge manages the Forwarding Database (FDB), you are guessing when container networking starts dropping packets under load.
Most engineers treat the bridge as a black box. In production, that black box is often the exact reason for latency spikes, black holes, and intermittent connectivity failures.
This guide exposes what actually happens inside the Linux kernel.
The Virtual Core of Modern Networking
Every time you launch:
- A Docker container
- A Kubernetes pod
- A virtual machine
You rely on a Linux kernel feature that has existed for decades:
The Linux Bridge
The Linux bridge is:
- A virtual Layer 2 switch
- Implemented entirely inside the kernel
- Responsible for forwarding Ethernet frames between interfaces
In container environments:
- Each namespace has a VETH interface
- One end stays in the namespace
- The other end connects to a Linux bridge
- The bridge forwards traffic between containers
Understanding this broadcast domain is essential for debugging production networking.
Lab Architecture
We will build a real multi-node Layer 2 network inside one host.
Environment:
- Ubuntu 24.04
- iproute2
- bridge-utils
Install tools:
$ sudo apt update
$ sudo apt install -y iproute2 bridge-utils tcpdump
Lab Topology
We will create:
- Four namespaces:
ns1tons4 - One Linux bridge:
br0 - Four VETH pairs
Final design:
ns1 ---\
ns2 ---- br0 --- (virtual switch inside kernel)
ns3 ---/
ns4 ---/
Step 1 — Create Namespaces
$ sudo ip netns add ns1
$ sudo ip netns add ns2
$ sudo ip netns add ns3
$ sudo ip netns add ns4
Verify:
$ sudo ip netns list
ns1
ns2
ns3
ns4
Each namespace is isolated and has only loopback.
Step 2 — Create the Linux Bridge
Create bridge device:
$ sudo ip link add br0 type bridgeBring it up:
$ sudo ip link set br0 upVerify:
$ ip -br linkExample output:
lo               UNKNOWN
eth0             UP
br0              UP
This is not configuration. This is a real virtual device in the kernel.
Step 3 — Create VETH Pairs
Create four VETH pairs:
$ sudo ip link add veth1 type veth peer name veth1-br
$ sudo ip link add veth2 type veth peer name veth2-br
$ sudo ip link add veth3 type veth peer name veth3-br
$ sudo ip link add veth4 type veth peer name veth4-br
Check:
$ ip -br linkYou should see all veth interfaces.
Step 4 — Move Namespace Ends
Move one side of each pair into namespaces:
$ sudo ip link set veth1 netns ns1
$ sudo ip link set veth2 netns ns2
$ sudo ip link set veth3 netns ns3
$ sudo ip link set veth4 netns ns4
Rename inside namespaces:
$ sudo ip netns exec ns1 ip link set veth1 name eth0
$ sudo ip netns exec ns2 ip link set veth2 name eth0
$ sudo ip netns exec ns3 ip link set veth3 name eth0
$ sudo ip netns exec ns4 ip link set veth4 name eth0
Step 5 — Attach Host Ends to Bridge
Attach bridge-side interfaces:
$ sudo ip link set veth1-br master br0
$ sudo ip link set veth2-br master br0
$ sudo ip link set veth3-br master br0
$ sudo ip link set veth4-br master br0
Bring them up:
$ sudo ip link set veth1-br up
$ sudo ip link set veth2-br up
$ sudo ip link set veth3-br up
$ sudo ip link set veth4-br up
Verify bridge membership:
$ bridge link showExample:
veth1-br state UP master br0
veth2-br state UP master br0
veth3-br state UP master br0
veth4-br state UP master br0
The kernel switch is now wired.
Step 6 — Configure Namespace IPs
Inside each namespace:
ns1:
$ sudo ip netns exec ns1 ip addr add 10.22.33.7/24 dev eth0
$ sudo ip netns exec ns1 ip link set eth0 up
$ sudo ip netns exec ns1 ip link set lo up
ns2:
$ sudo ip netns exec ns2 ip addr add 10.22.33.8/24 dev eth0
$ sudo ip netns exec ns2 ip link set eth0 up
$ sudo ip netns exec ns2 ip link set lo up
ns3:
$ sudo ip netns exec ns3 ip addr add 10.22.33.9/24 dev eth0
$ sudo ip netns exec ns3 ip link set eth0 up
$ sudo ip netns exec ns3 ip link set lo up
ns4:
$ sudo ip netns exec ns4 ip addr add 10.22.33.10/24 dev eth0
$ sudo ip netns exec ns4 ip link set eth0 up
$ sudo ip netns exec ns4 ip link set lo up
Test Connectivity
From ns1:
$ sudo ip netns exec ns1 ping -c 2 10.22.33.8Output:
64 bytes from 10.22.33.8: icmp_seq=1 ttl=64 time=0.2 ms
64 bytes from 10.22.33.8: icmp_seq=2 ttl=64 time=0.1 ms
All namespaces can communicate through br0.
The Linux bridge is functioning as a Layer 2 switch.
Deep Dive: The Forwarding Database (FDB)
The Linux bridge maintains a Forwarding Database (FDB).
This works exactly like a physical switch:
When a frame enters the bridge:
-
The bridge reads the source MAC.
-
It records:
MAC → Port -
It stores this in the FDB.
Inspect the FDB
Run:
$ bridge fdb show br0Example output:
8a:3b:12:44:aa:01 dev veth1-br master br0
8a:3b:12:44:aa:02 dev veth2-br master br0
8a:3b:12:44:aa:03 dev veth3-br master br0
8a:3b:12:44:aa:04 dev veth4-br master br0
These are dynamically learned MAC addresses.
How Packet Forwarding Works
When a frame hits br0:
Known Destination MAC
- Bridge looks up MAC in FDB
- Forwards only to correct port
- Efficient unicast forwarding
Unknown Destination MAC
- Bridge floods packet
- Sends to all ports except source
- This is how ARP requests propagate
The Silent Killer: Stale FDB Entries
Production scenario:
- Pod dies
- New pod gets same IP
- MAC address changes
- FDB still points to old port
Result:
- Bridge forwards traffic to deleted interface
- Packets are dropped
- Service becomes unreachable
Default ageing time:
$ cat /sys/class/net/br0/bridge/ageing_time
30000
This is 300 seconds (value is in centiseconds).
300 seconds is long in high-churn environments.
Flushing the FDB
If debugging:
$ sudo bridge fdb flush br0This forces relearning.
Adjust Ageing Time
Set ageing time to 60 seconds:
$ echo 6000 | sudo tee /sys/class/net/br0/bridge/ageing_time6000 = 60 seconds.
Lower ageing time improves recovery in dynamic clusters.
Security Insight
Static FDB entry:
$ sudo bridge fdb add aa:bb:cc:dd:ee:ff dev veth1-br master permanentThis:
- Prevents spoofing
- Prevents unicast flooding attacks
- Locks MAC to specific port
If FDB is overflowed:
- Bridge floods all traffic
- Acts like a hub
- Enables packet sniffing
Monitoring FDB size is critical in multi-tenant systems.
The Mental Model: The Kernel Switchboard
Think of the Linux bridge as a switchboard operator.
Every time a frame arrives:
- The operator writes down where it came from.
- When a frame needs forwarding, the operator checks the notebook.
- If known, connects directly.
- If unknown, shouts across all rooms.
The ageing time is how long the operator keeps a name before erasing it.
Conclusion
You have built:
- A multi-port Linux bridge
- A real Layer 2 broadcast domain
- A dynamic Forwarding Database
- A production-relevant simulation
This is not Docker magic.
This is core Linux kernel logic.
Understanding:
- FDB learning
- Flooding behavior
- Ageing timers
- Static entries
Allows you to debug real container networking failures instead of restarting services blindly.
Once you master the Linux bridge, container networking stops being mysterious and starts being predictable.